Our Horse, Dyed
Now that all the sanding and other prep is finally complete, you can move on to the finishing. I dyed mine (her name is 'Rosehip', by the way) using Colron Wood Dye in Indian Rosewood; many rocking horses are painted, either in the classic 'dapple grey' pattern or in more individual style, but I can't offer any advice on how to do that.
I was quite nervous about starting this phase because I'd never dyed wood before and I really didn't want to ruin all the hard work I'd put in up to this point. However, having watched a few videos on YouTube, I dived in and it turned out to be very easy. The most important tip is to really flood the surface of the wood with dye, using a rag that is completely saturated. Spread it out evenly to leave a glistening, even layer, and then leave it! Don't be tempted to go back and touch up a small area, because any extra dye you add after the first coat has dried will darken the colour substantially and leave a patchy appearance.
This is how I did it... first, thoroughly clean the stand and horse - I started by brushing them off, then went over them with the vacuum cleaner, and finally wiped them over with a clean rag and white spirit (this picks up any remaining dust and also removes any greasy/oily finger marks etc). Make sure you have a clear work area so that you'll be able to complete all the dying in one session without having to stop to move furniture around or anything. I also prepared four small squares of plywood for the horse's feet to stand on, so that my rag wouldn't touch the floor and pick up dust, and hung the leg rails from the ceiling so that I could dye them without having to lay them down on a work surface.
I started with the stand, turning it upside down on my work bench to work on the undersides first. Give the dye a good shake and then tip about 50ml or so into a separate container - I used a 500ml plastic Tesco soup container. The dye has a very thin consistency, barely thicker than water, and a little goes a long way - I only used half a 250ml tin of dye for the whole project. Take a small piece of clean cotton rag (old T-shirts are ideal) about 15cm square and thoroughly soak it in the dye - make sure to wear rubber gloves or your fingers will end up the same colour as your horse. Squeeze the rag just enough so that it won't drip everywhere, then wipe it fairly rapidly across the surface of the wood.
The surface will naturally take up a certain amount of dye, but no more - just wipe lightly across each surface, watch out for drips at the edges, gently wipe off any excess, and move on to the next section. When the undersides are done, turn the stand over and finish all the remaining surfaces, then leave it to dry.
I followed the same process for the horse, starting with it upside down to dye the belly and the insides of the legs, then turning it right-way-up to complete the rest.
Here's the stand before dying:

and here it is after the dye is applied:

Here are a couple of shots of the horse after the dye is applied:


The dye dramatically changed the appearance of the horse; the dye gets absorbed differently by the different plies in the plywood, leading to a beautiful striped effect. I wasn't expecting that to happen but was pretty happy with it!
The dye is absorbed into the wood, rather than forming a film on the surface, so it leaves a matt finish... it just needs a coat of varnish to make it pop.
One small warning: as mentioned in a previous post, you do need to be careful to sand all surfaces of the stand to an even smoothness, because the dye will highlight any areas you miss. The photo below shows the end grain of one end of the bottom rail, and you can see how the left side is distinctly darker than the right:
The darker area also feels distinctly rougher to the touch than the right, so I'm pretty confident that if I'd sanded this area a bit better, the colour would have been more consistent. This only affects a couple of small areas on our horse so I'm not too bothered by it.
 |
| I got dye on this chap's sleeve, sorry dude. |
I was quite nervous about starting this phase because I'd never dyed wood before and I really didn't want to ruin all the hard work I'd put in up to this point. However, having watched a few videos on YouTube, I dived in and it turned out to be very easy. The most important tip is to really flood the surface of the wood with dye, using a rag that is completely saturated. Spread it out evenly to leave a glistening, even layer, and then leave it! Don't be tempted to go back and touch up a small area, because any extra dye you add after the first coat has dried will darken the colour substantially and leave a patchy appearance.
This is how I did it... first, thoroughly clean the stand and horse - I started by brushing them off, then went over them with the vacuum cleaner, and finally wiped them over with a clean rag and white spirit (this picks up any remaining dust and also removes any greasy/oily finger marks etc). Make sure you have a clear work area so that you'll be able to complete all the dying in one session without having to stop to move furniture around or anything. I also prepared four small squares of plywood for the horse's feet to stand on, so that my rag wouldn't touch the floor and pick up dust, and hung the leg rails from the ceiling so that I could dye them without having to lay them down on a work surface.
I started with the stand, turning it upside down on my work bench to work on the undersides first. Give the dye a good shake and then tip about 50ml or so into a separate container - I used a 500ml plastic Tesco soup container. The dye has a very thin consistency, barely thicker than water, and a little goes a long way - I only used half a 250ml tin of dye for the whole project. Take a small piece of clean cotton rag (old T-shirts are ideal) about 15cm square and thoroughly soak it in the dye - make sure to wear rubber gloves or your fingers will end up the same colour as your horse. Squeeze the rag just enough so that it won't drip everywhere, then wipe it fairly rapidly across the surface of the wood.
The surface will naturally take up a certain amount of dye, but no more - just wipe lightly across each surface, watch out for drips at the edges, gently wipe off any excess, and move on to the next section. When the undersides are done, turn the stand over and finish all the remaining surfaces, then leave it to dry.
I followed the same process for the horse, starting with it upside down to dye the belly and the insides of the legs, then turning it right-way-up to complete the rest.
Here's the stand before dying:
and here it is after the dye is applied:
Here are a couple of shots of the horse after the dye is applied:
The dye is absorbed into the wood, rather than forming a film on the surface, so it leaves a matt finish... it just needs a coat of varnish to make it pop.
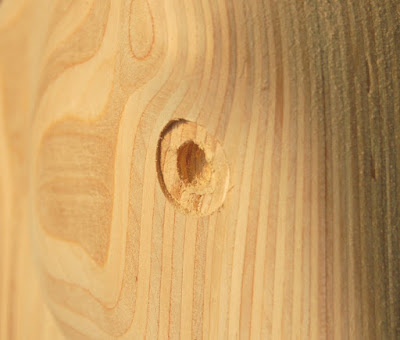
One small warning: as mentioned in a previous post, you do need to be careful to sand all surfaces of the stand to an even smoothness, because the dye will highlight any areas you miss. The photo below shows the end grain of one end of the bottom rail, and you can see how the left side is distinctly darker than the right:
 |
| Uneven sanding leads to uneven colour... |
The darker area also feels distinctly rougher to the touch than the right, so I'm pretty confident that if I'd sanded this area a bit better, the colour would have been more consistent. This only affects a couple of small areas on our horse so I'm not too bothered by it.


Comments
Post a Comment